The Element API
The Firebox elements application programming interface (API) focus on simplicity
and minimal expression. Specifically this means that when you want to move an
element you call the #move method etc.. Every programming language has an API
that simplifies how to accomplish an objective.
In this chapter we will look closer at the Element API and get to know how to
navigate around the display. We will work more with creating scripts and how to
run them.
The Display
Programming is a series of instructions that tell the computer what and when to
do some task. In Firebox when you work with elements you write code that
instantly gives a visual reference to the code. This visual representation of
the code occupy a two-dimensional coordinate plane. This means that an element
has a position point with an x and y number.
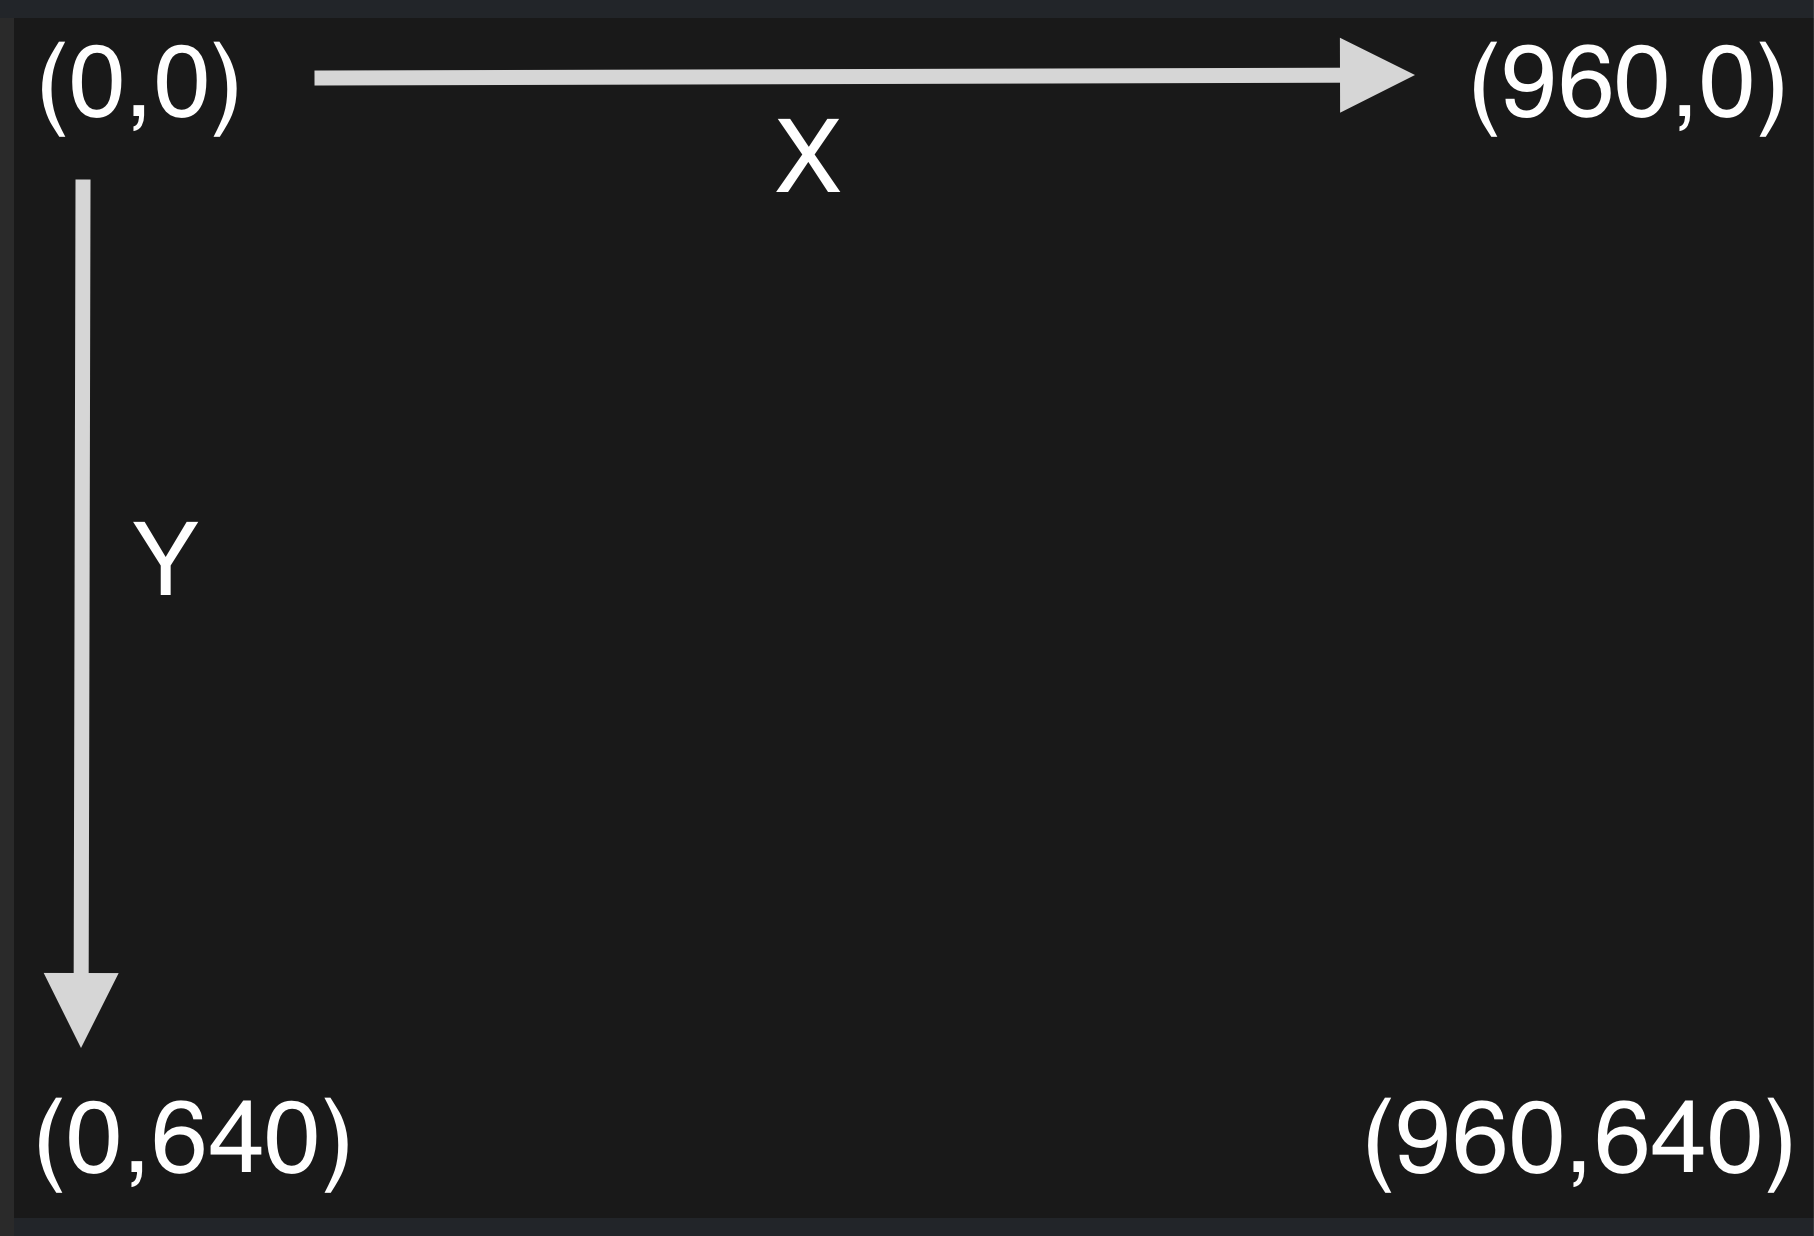
The x coordinate represents the horizontal placement and the y represents the
vertical placement. The display is 960 points wide and 640 points high and the
center of the display is at point 480, 320.
To move the element anywhere in the display you specify its position x
and y coordinates within the size of the display. Setting values beyond the
display size will move it out of view. The elements position point holds the
information about where the element is located. If you want to manipulate the
direction the element is facing you adjust its angle which is defined in degrees.
Elements can rotate 360 degrees where 0 degrees is the direction to the right,
90 degrees is the direction down, 180 degrees is the direction to the left and
finally 270 degrees is the direction up.
Code
The code you write determines what happens inside the display. Behind the scene
there could be multiple things happening when calling simple element methods.
Knowing what to write is the hard part about programming. Examples, API
documentation and knowledge built will be key to creating your own apps.
There are many different element methods that you need to learn in order to
write your own code. Lets look at some of the movement methods.
To display an element of a specific type you call the display.* library.
1
display.emoji("🤩")
To move the emoji element you need to change the x or y coordinate of the
element. Let’s start by making a handle to the element.
1
starman = display.emoji("🤩")
Now its possible to call methods on the starman element handle.
1
2
3
4
5
starman = display.emoji("🤩")

starman.goTo(100, 100)

starman.angle = 25
The starman handle is called a variable. A variable can hold different data
types. And our starman variable holds an element of the type emoji.
There are many methods to call on the starman variable.
Movement
Now that we have looked at the basics of running code lets take a closer look at
the ways we move elements around the display. There are multiple methods dealing
with movement and motion which will give a different effect when moving elements
around the display.
The #move(steps) method moves the element the number of steps specified as the
argument. The number of steps is equal to the number of points across the
display you want to move the element. If the number is positive the element will
move in the direction the element is pointing to. If the number is negative the
element will move away from the direction it is pointing to. For example the
following code will move the element 10 points in the direction it is pointing.
1
2
3
elem = display.emoji("🤩")

elem.move(10)
To change to orientation in which the element is pointing there are several
methods which can be used. The #turnRight(degrees) method turns the element
clockwise amount of degrees depending on the value given. Likewise the
#turnLeft(degrees) method rotates the element counterclockwise the amount of
degrees given.
1
2
3
4
5
6
7
elem = display.emoji("🤩")

// rotate clockwise 10 degrees
elem.turnRight(10)

// rotate counterclockwise 10 degrees
elem.turnLeft(10)
As an alternative the #rotate(degrees) can also be used to achieve the same
result.
1
2
3
4
5
6
7
elem = display.emoji("🤩")

// rotate clockwise 10 degrees
elem.rotate(10)

// rotate counterclockwise 10 degrees
elem.rotate(-10)
The #pointInDirection(degree) method can be used to set the direction for an
element. Setting the elem.pointInDirection(90) rotates the element 90 degrees.
The #pointTo(other) method points the element to another element given as the
method argument. The other object can be any other element that has a position
coordinate point. This can for example be another element or the mouse input.
Example of an element pointing to the mouse input.
1
2
3
4
5
elem = display.emoji("🤩")

update(() => {
  elem.pointTo(input)
})
The #moveTo(point) sends the element sliding across the display to the point
position given as an argument.
1
2
3
elem = display.emoji("🤩")

elem.moveTo(100, 100)
The #goTo(point) moves the element immediately from one position point to
another without delay. It is also possible to call #goTo(input) which moves
the element towards the mouse input. The goTo will work with both x, y
coordinates and position point the input or other elements in the display have.
Example: Use goTo to move to coordinates
1
2
3
elem = display.emoji("🤩")

elem.goTo(100, 100)
Example: Use goTo to move to mouse input
1
2
3
4
5
elem = display.emoji("🤩")

update(() => {
  elem.goTo(input)
})
The #changeX(value) method changes and updates the x coordinate of the
element. There are also multiple ways of achieving updating the x coordinate of
the element.
The ways of modifying an elements x coordinate position by 10 points
1
2
3
4
5
6
7
8
9
10
11
elem = display.emoji("🤩")
elem.changeX(10)

// modify the x coordinate
elem.x += 10

// this is equivalent
elem.x = elem.x + 10

// modify the x coordinate position
elem.position.x += 10
There are multiple ways of achieving the same result in programming and you can
choose what you think is the most suitable to use in the code you write.
The #changeY(value) method does the same to the y coordinate of an element as
the changeX method does to the x coordinate for an element.
Example: Ways of modifying the y coordinate
1
2
3
4
5
6
7
8
9
10
11
elem = display.emoji("🤩")
elem.changeX(10)

// modify the y coordinate
elem.y += 10

// this is equivalent
elem.y = elem.y + 10

// modify the y coordinate position
elem.position.y += 10
The #setX(value) method sets the x coordinate to the value given which moves
the element to that x position. There are also multiple ways to set the x
coordinate to a value.
Set the x coordinate to a specified value
1
2
3
4
5
6
elem = display.emoji("🤩")

elem.setX(100)

// An equivalent way to set the x coordinate
elem.x = 100
Likewise the #setY(value) method sets the y coordinate of an element to a
specified value. The element is moved to the specified y position.
Set the y coordinate to a specified value
1
2
3
4
5
6
elem = display.emoji("🤩")

elem.setY(100)

// An equivalent way to set the y coordinate
elem.y = 100
If an element reaches the edge of the screen and you want it to bounce back in
the opposite direction the #ifOnEdgeBounce() method can be used. When an
element reaches the edge of the display it will change orientation and move in
the opposite direction of what it was moving.
Example of ifOnEdgeBounce() usage
1
2
3
4
5
6
elem = display.emoji("🤩")

update(() => {
  elem.move(2)
  elem.ifOnEdgeBounce()
})
The position coordinates and direction the element is heading can be printed for
debugging.
1
2
3
4
5
6
7
8
9
10
11
12
13
14
15
xl = ui.label("x", 100, 50)
yl = ui.label("y", 100, 110)
al = ui.label("a", 100, 170)

elem = display.emoji("🤩")
elem.angle = random.num(0, 360)

update(() => {
  xl.value = elem.x.round()
  yl.value = elem.y.round()
  al.value = elem.angle.round()

  elem.move(5)
  elem.ifOnEdgeBounce()
})
Summary
In this chapter we looked at the Element API and how its focused on simplicity.
We looked at the Firebox display and how the elements are represented inside it
in a coordinate system and that changing the elements position moves it around
the display.
We looked at coding and how we can manipulate the elements in the display by
changing its properties through the use of variables.
Then we looked at element methods to move and rotate the elements. We also
looked at how we can get elements to point to other elements.
We also looked at the different ways of achieving the same result when
manipulating the elements coordinates.
There were some examples of how to use the update loop method and at last we
looked at the usage of #ifOnEdgeBounce().
This ends the introduction into the Firebox framework. The next set of chapters
will look at how to make games in Firebox and we will create simple games and
gradually introduce more complex programming methodologies.